Build Windows 10 Kernel Driver Development Environment
This article introduces you how to build Windows 10 kernel driver development Environment, install drivers and build debug environment.
Below are the softwares for building development and debug environment.
- Windows 10
- Visual Studio 2017
- SDK10
- WDK10
- Virtual Machine.
- Windows 10 for Virtual Machine.
- DbgView
Note:
- VS is short for Vistual Studio.
- VS 2017 is short for Vistual Studio 2017.
Build Windows 10 Kernel Driver Development Environment
1. Windows 10
First, let’s see the relationship between Windows version and Software Development Kit) SDK, (Window Driver Kit)WDK. According to Microsoft’s official documentation, windows, SDK and WDK should be matched as below.
- Windows 10 1809 version corresponds to VS2017 +SDK1809+WDK1809
- Windows 10 1803 version corresponds to VS2017+SDK1803+WDK1803
- Windows 10 1709 version corresponds to VS2017+SDK1709+WDK1709
- ……
I used the Windows 10 1709 version. If you would like to know more about the combination, please visit Microsoft official webiste.
Note:
- For each operating system version, the corresponding VS, SDK and WDK must be used to set up the development environment.
- The installation sequence must be VS2017, SDK, WDK.
- How do I check the version of my system?
- Click Win + R buttons and enter winver.
- You can see version likes “version 1709 (OS internal version 16299.726)” in About “Windows” window.
2. Visual studio 2017
I like Visual Studio 2017 better than the 2015 version. It has a dedicated installer so you can choose what you want to download, making VS itself a bit lighter. And it can be easily modified later.
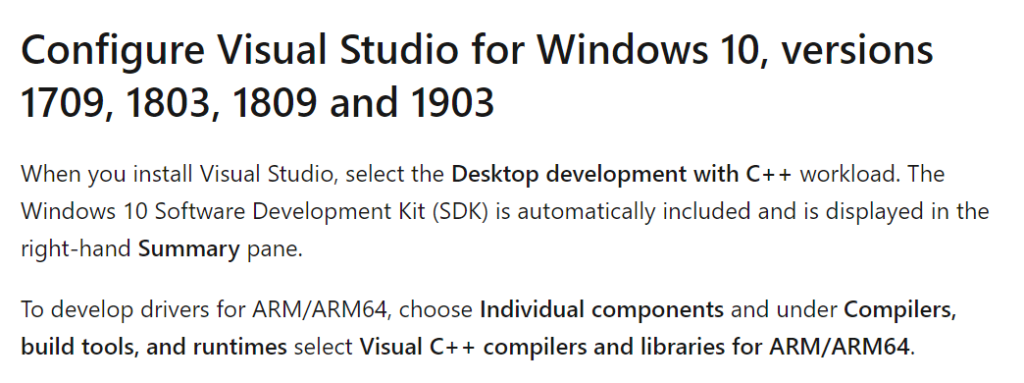
Here we just need to choose the simplest C/C++. You can see in the display bar on the right that it also downloads an SDK by default, but the SDK is actually newer than the version we need, so you may want to consider undownloading it. If you need to use the MFC later, you can also check this option to have it download the MFC. But it’s all very easy to modify later.
Then you click the install button and it installs as it downloads. And then you just wait.
3. SDK+WDK
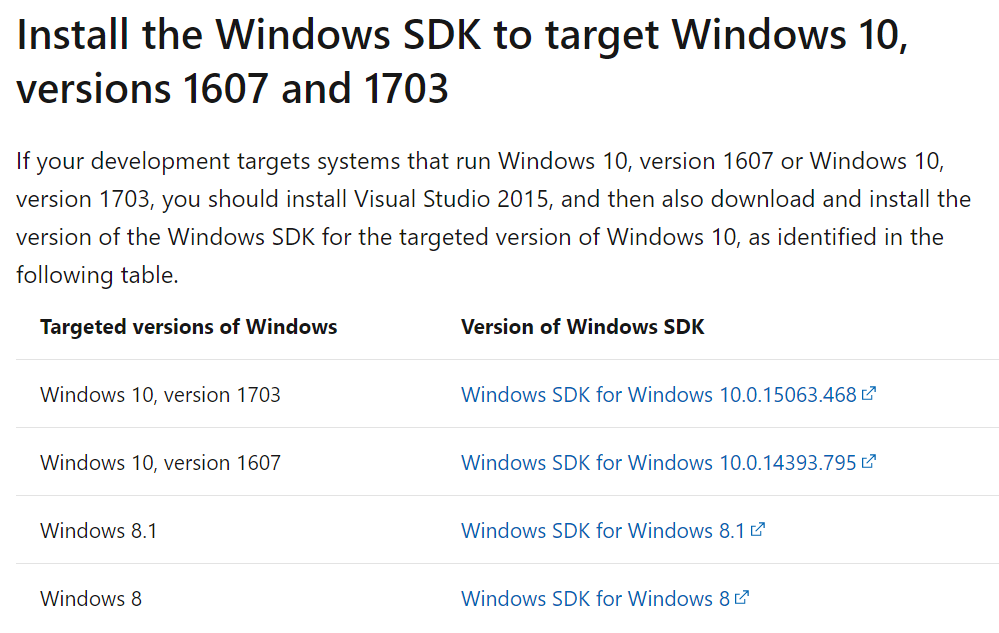
About SDK, please refer to below pictures according to your Windows version. If you would like to know more, please visit official website.
About WDK, Download the corresponding WDK from official website and install it as below.
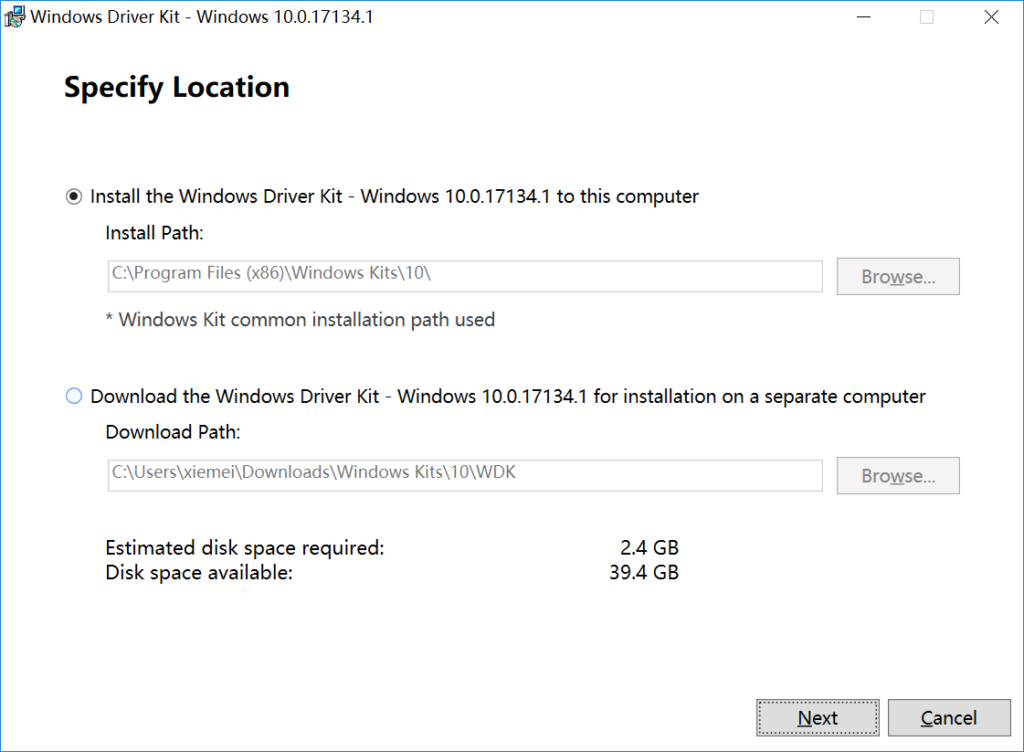
After downloading SDK 16299 and WDK 16299. Install the SDK first, and then install the WDK after the SDK is installed successfully. After installing the WDK, you will be prompted to install the Visual Studio plugin. This must be installed. Otherwise, there is no option to create a kernel driver project in Visual Studio.
Note:
- You can choose download the SDK and WDK first, then install them. Also, you can choose to install them online.
- According to official document, the correct SDK has been installed when we installed VS 2017. You can check this after installing VS 2017, if the correct version is not installed, you need remove the default one, then download and install the correct one.
- When you finished installing SDK and WDK, you can see these two software in your control pannel as below picture. It means you have installed SDK and WDK successfully. (Of course, Your internal version is not necessarily 16299.)

4. Test
After installing SDK, WDK and VS plugin. You can see the Driver option as below.
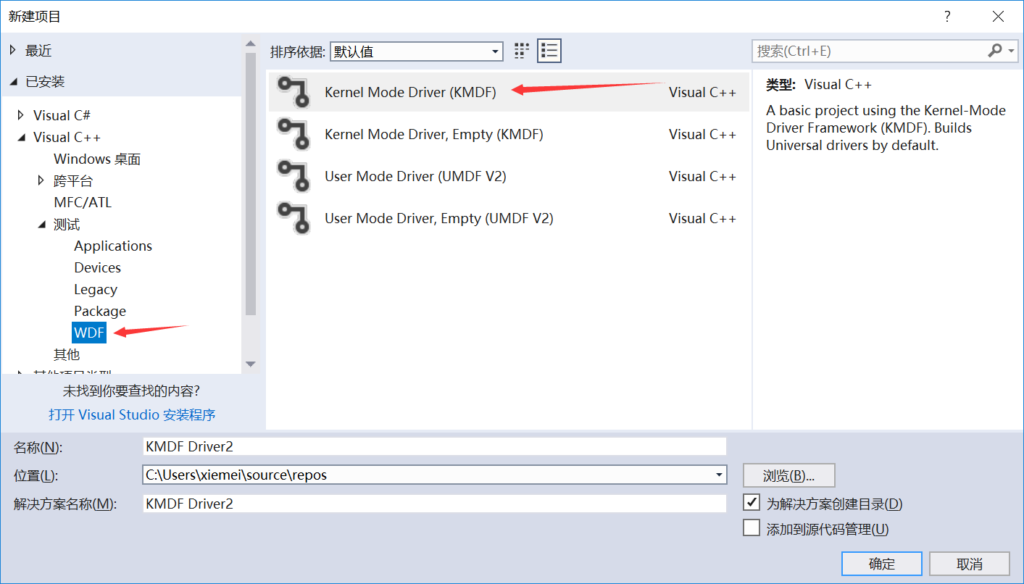
NOW, let’s us check if we have built the correct environment for developing kernel driver program.
- Create a new Project.
- Select the WDF as above picture, then select KMDF. There is the demo code in the project. If you can compile it, it means we have already built a correct environment for kernal driver development.
5. Configuration
Now let’s talk about the configuration issues of VS for developing a Window kernel driver.
Right-click the project name and select Properties.
- Click General ->WindowSDK Version.If it is $(LatestTargetPlatformVersion), then the default version is used to compile, if the default SDK downloaded by VS is not what we need, then it will get compile error. we only need to click this option to choose the version we need.
- Click on the C/C++-> General -> warning level. Change it from level 4 to level 3.
- Driver Setting->General ->Target Platform. Change it from Universal to Desktop.
- The Driver Install – > Deployment. This is the automatic deployment of the application to the test machine, which is the virtual machine. But I haven’t installed it successfully before, so I won’t introduce it. Just let you know about it.
- Driver Install -> KMDF Verifier->Enable KMDF Verifier. Change it from KMDF Verifier Is Off to Always On.
Installing Driver
Because I am new to Windows kernel driver development, I don’t know how to install the driver compiled by myself. there are some tools to install the driver, but it is very bad to use. Then I found installation tutorial on Microsoft website, actually we don’t need to used a third party to install the driver.
Steps to install the driver manually:
- Set the system in the virtual machine to test mode. Use admin privileges to open the command prompt and rsun “BCDEDIT/SET {CURRENT} TestSigning on” command. After reboot, there will be a watermark in the lower right corner of the computer.
- Open Control Panel -> Network and Internet -> Network and Shared Center-> Change the network adapter Settings in the virtual machine.
- Find the network used in this virtual machine.
- Right click Properties -> Setup -> Select Service -> Add -> Install from Disk -> Click Browse button to find the driver’s.inf file -> OK.
Note:
Ignore signature reminders. In fact, we do have the test signature authentication.
Congratulations. The installation is complete.
Build Debug Environment
1. Install Windows in virtual machine
Step 1:
Install the Windows image(Windows 1709) like normal case until the last page – Custom hardware.
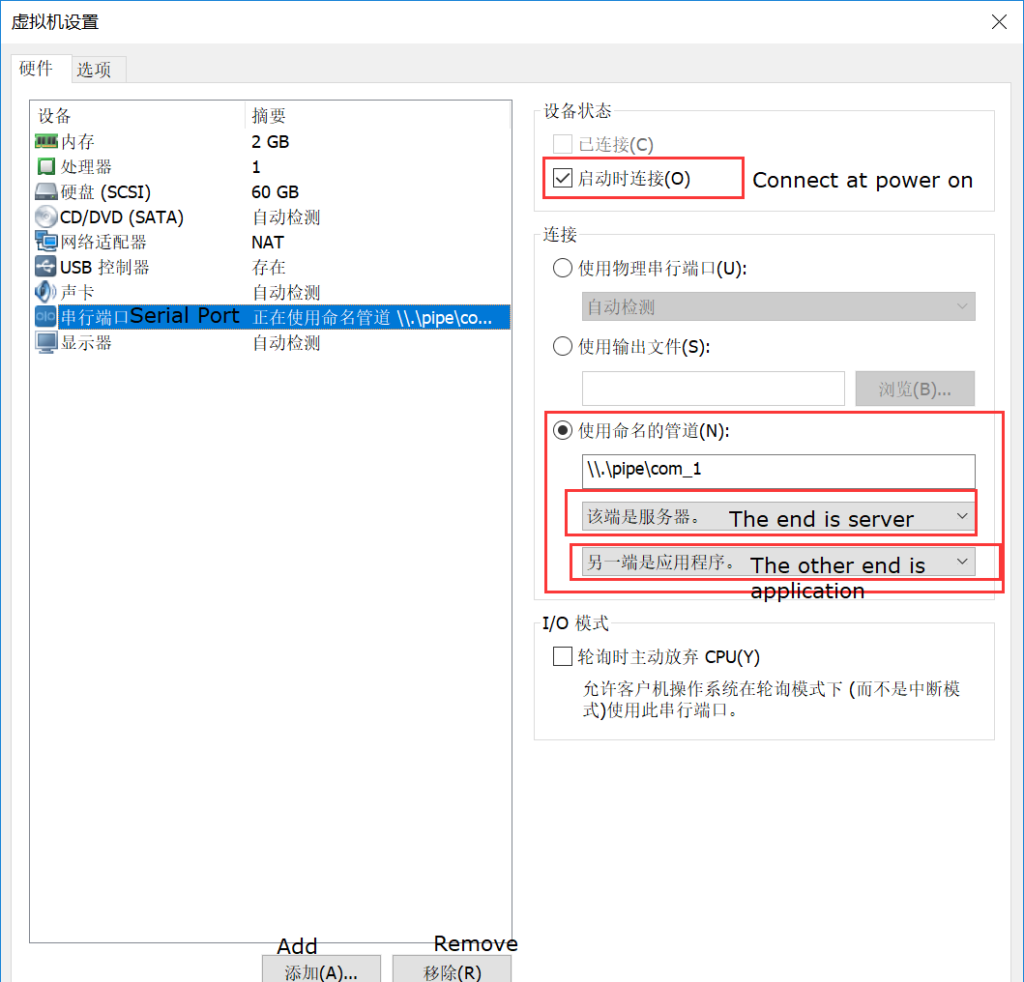
Click on Custom Hardware, remove the printer first (because the printer will take up a port, it will make an error if you are not careful).
Then select Add -> Serial Port, select “Use a named pipe”, enter “\.\pipe\com_1”. Select “this end is the server” for the first drop down box, the other end is the application.
Select the check box named “Connect at power on”.
Please refer to below picture.
Step 2: Install debug tool.
Find the following.msi files in the WDK installation package. Copy the platform’s.msi file to the operating system in the virtual machine and install it. A lot of blogs talk about this, but they don’t explain what it’s for, especially if you’re just starting driver development and you know you need to install it, but you don’t know why. The installation of this file is to enable VS2017 to be remotely debugged, which means that the following attached to the process can be carried out successfully.

2. Configure the debugging machine in Visual Studio
Step 1: Congigure the device. Click the “Configure Devices” as below.
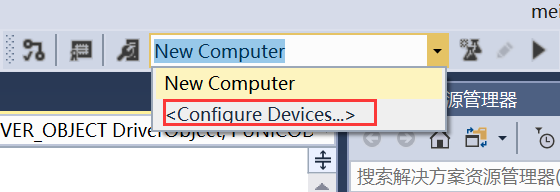
Then, you can see the below picture. Click “Add New Device” button.
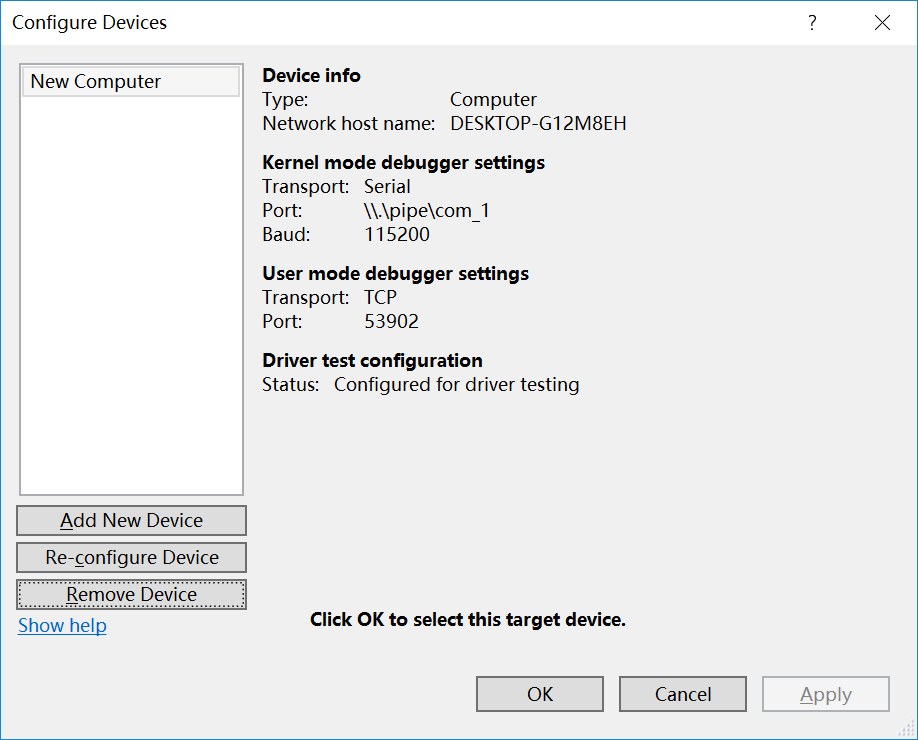
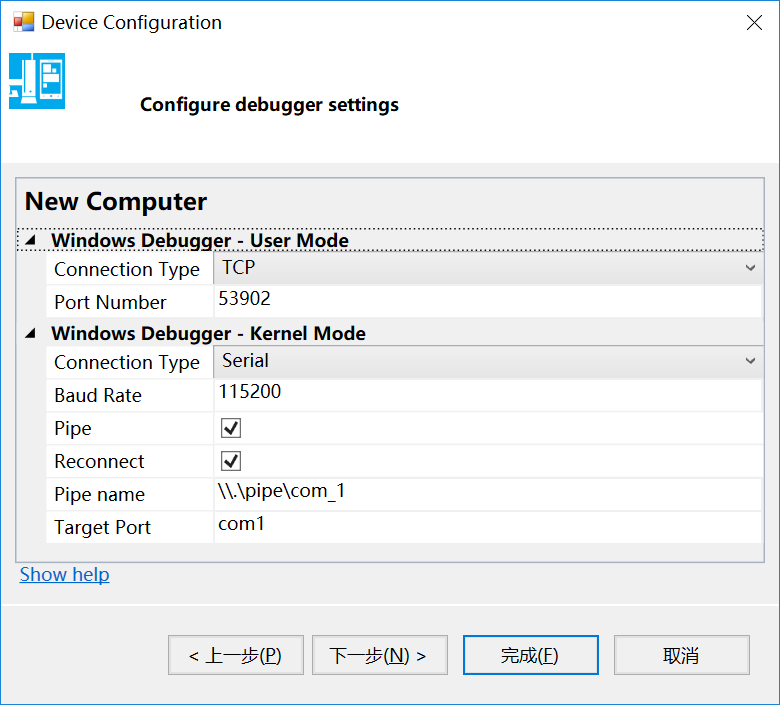
Let me show you how to fill in the following.
Display name: Whatever you want.
Network host name: It is your virtual machines’s name. In your virtual machine, You can Open the command prompt line and use the “hostname” command to see the hostname.
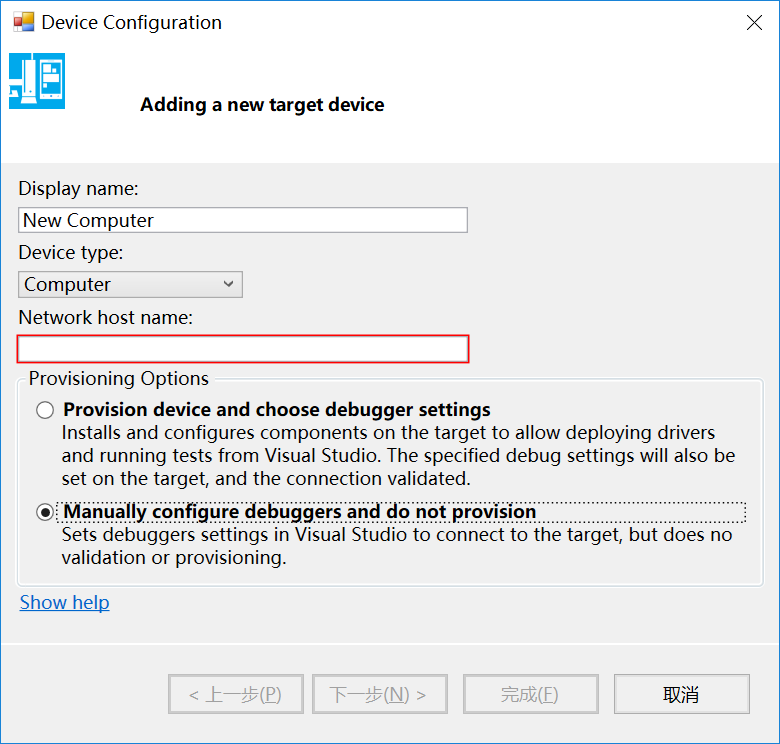
Next,
Step 2: Attach to process
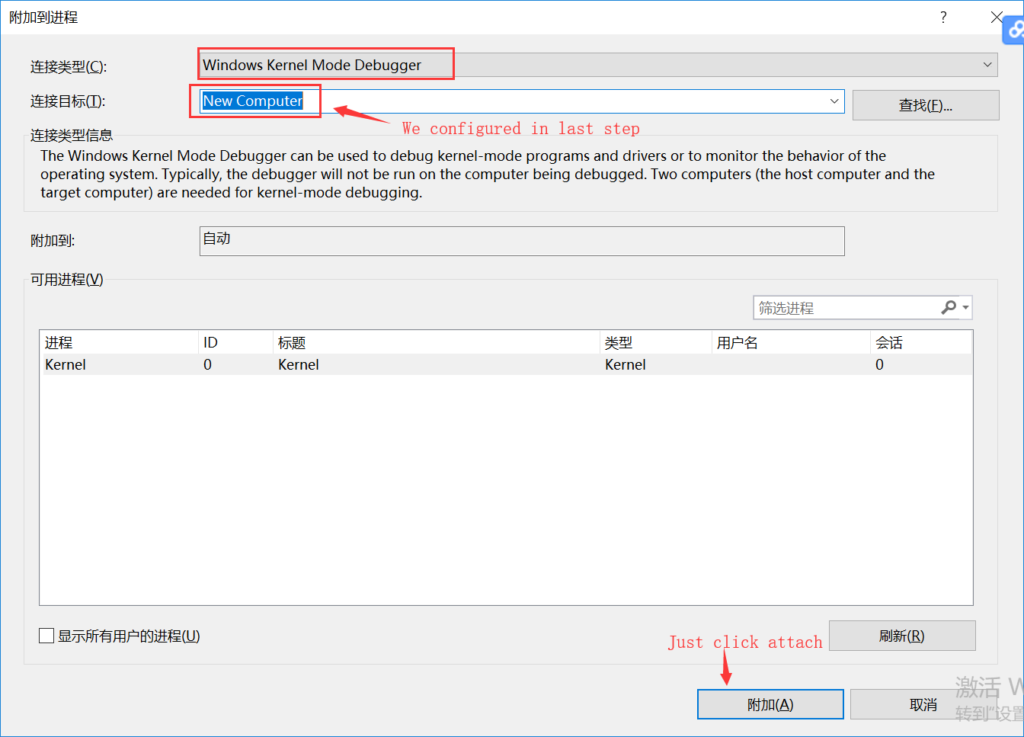
Select Debugging -> Attach to Process -> select Kernel Debugging + previously configured hostname -> and click Attach. As shown in the figure below.
Step 3: Debug
Set a breakpoint in your code, attach to the process according to the step, click Pause in VS, click Continue (we need to do like this), go to the virtual machine to install the driver, then it will jump to where the breakpoint was set.
Note: The.inf in the virtual machine must be the latest version, otherwise there will be no way to stop at the breakpoint.
3. DBGView, a tool for printing kernel information
DBGView is a tool for viewing information printed by the kernel.
The Kernel print information function is dbgPrint (“Kernel: “);
Note:
In order for this tool to print out kernel information, the kernel driver must be a Debug version and the Capture Kernel and Enable Verbose Kernel Output must be checked. As shown in the figure below.
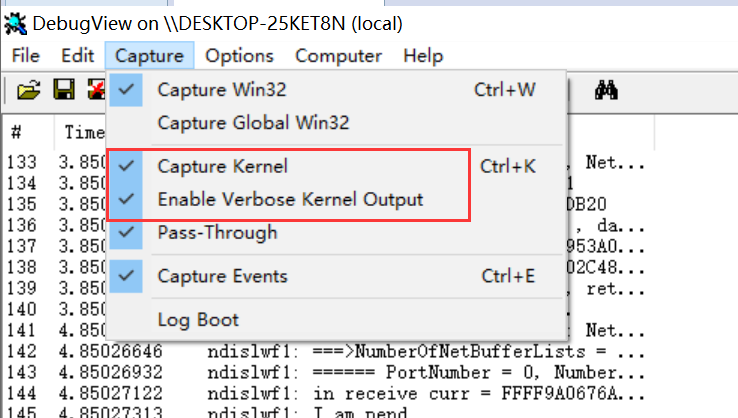
This software needs to be opened with administrator privileges, otherwise it will not be able to check the above two items.
So far, I believe you have set up the development environment, debugging environment, install the driver.
Enjoy..
Get ready for blue screens. Ha, ha, ha.
I really hope this article can give some help to you. And any feedback is welcome.